In my previous post, I walked you through the fundamentals of GitHub for documentation. You learned how to clone a repository, make edits locally, and push changes directly to the main branch using GitHub Desktop.
That workflow works beautifully when you're working solo or making quick fixes. But when you work as part of a documentation team, pushing directly to main becomes a liability.
Imagine you're deep in a massive rewrite of the API guide (a 2-week project). It's currently a mess—half-written paragraphs, broken links, notes to yourself.
Suddenly, a Product Manager rushes in: "The pricing page has a critical typo! It says $1000 instead of $10. We need to fix it NOW."
You're stuck. You can't publish the pricing fix without also publishing your messy API rewrite. You have to back up your files, undo all your API work, fix the typo, publish, and then try to paste your work back. A nightmare.
If this situation has ever made you nervous, that’s normal — branches exist because everyone hits this moment.
You could have easily fixed the typo if you had a private copy of the page to work on. You could have fixed the typo without affecting the draft for your API guide.
That's when the branches come into play. Branches let you create a private copy to work on. Branches aren't an advanced feature reserved for developers. They're the natural next step in your GitHub journey. Once you understand them, you'll wonder how you ever worked without them.
This guide builds on what you already know to learn how branches let you:
- Work on drafts without affecting published documentation
- Save work-in-progress safely to the cloud
- Experiment freely without fear of breaking things
And just like before, we're doing it all through GitHub Desktop. No command line required.
The "Main" branch: Your published book #
Your GitHub repository is like a printed book, and the default branch is called main. The main branch is simply the published version of your documentation that represents what exists in the world.
Just like a book in a bookstore, you can't just walk in and start scribbling notes in the margins. It is finished. It is public.
Feature branches: Your private draft #
When you want to edit your published documentation, you can't just hack away at the live site. You need a safe workspace.
A branch (often called a feature branch) gives you that private workspace. It's a copy of your documentation where you can make changes without affecting the published version. When you're ready, you can bring your changes back into the main view.
Crucially: Nobody else sees this mess.
- Your readers still see the pristine
mainversion. - Your teammates continue working on their own copies.
- You can work safely, knowing you can't break anything.
You only bring your work back into main when it's polished, proofread, and ready to be printed. Here's how that looks:
main branch (stable docs)          feature branch (your workspace)
       │                                      │
       │                                      │
       ●  Stable v1                           │
       │ ────────────────────────────────────▶●  Create branch
       │                                      │
       │                                      ●  Edit files
       │                                      │
       │                                      ●  Commit changes
       │                                      │
       ●  Still stable                        ●  More commits
       │  (readers see this)                  │
       │                                      ●  Work complete
       │ ◀────────────────────────────────────┘
       │         Merge via Pull Request
       │
       ●  Now includes your changes
       │
Reading the diagram:
- main branch (left) represents your stable, published documentation
- feature branch (right) is your parallel workspace
- Work happens on the feature branch without affecting main
- Only when complete does the feature branch come back into main
Branching strategies for documentation #
A branching strategy is a set of rules that defines how your team uses branches. Ideally, it answers two questions:
- When should you create a new branch?
- When should you merge it back?
Developers often use complex strategies (like GitFlow or Trunk Based Development) to manage software releases. But for documentation, you don't need that complexity.
The Writer's Strategy: One Task, One Branch #
Most documentation teams follow a streamlined strategy called Feature Branching (or Topic Branching). The rule is simple: New task? New branch. This is the core of an efficient Git workflow for technical writers.
You don't need to overthink it.
- Fixing a typo? New branch.
- Writing a new guide? New branch.
- Updating screenshots? New branch.
Keep your branches focused. If you're fixing a typo and writing a new guide, create two separate branches. This keeps your work organized and makes it easier for others to review.
Working with branches in GitHub Desktop #
Now that you understand the strategy, let's put it into practice using GitHub Desktop.
Create your branch #
As the rule of thumb states: New task? New branch. Before you start editing files for any new task, whether it's a major rewrite or a simple typo fix, create a branch.
Here's how:
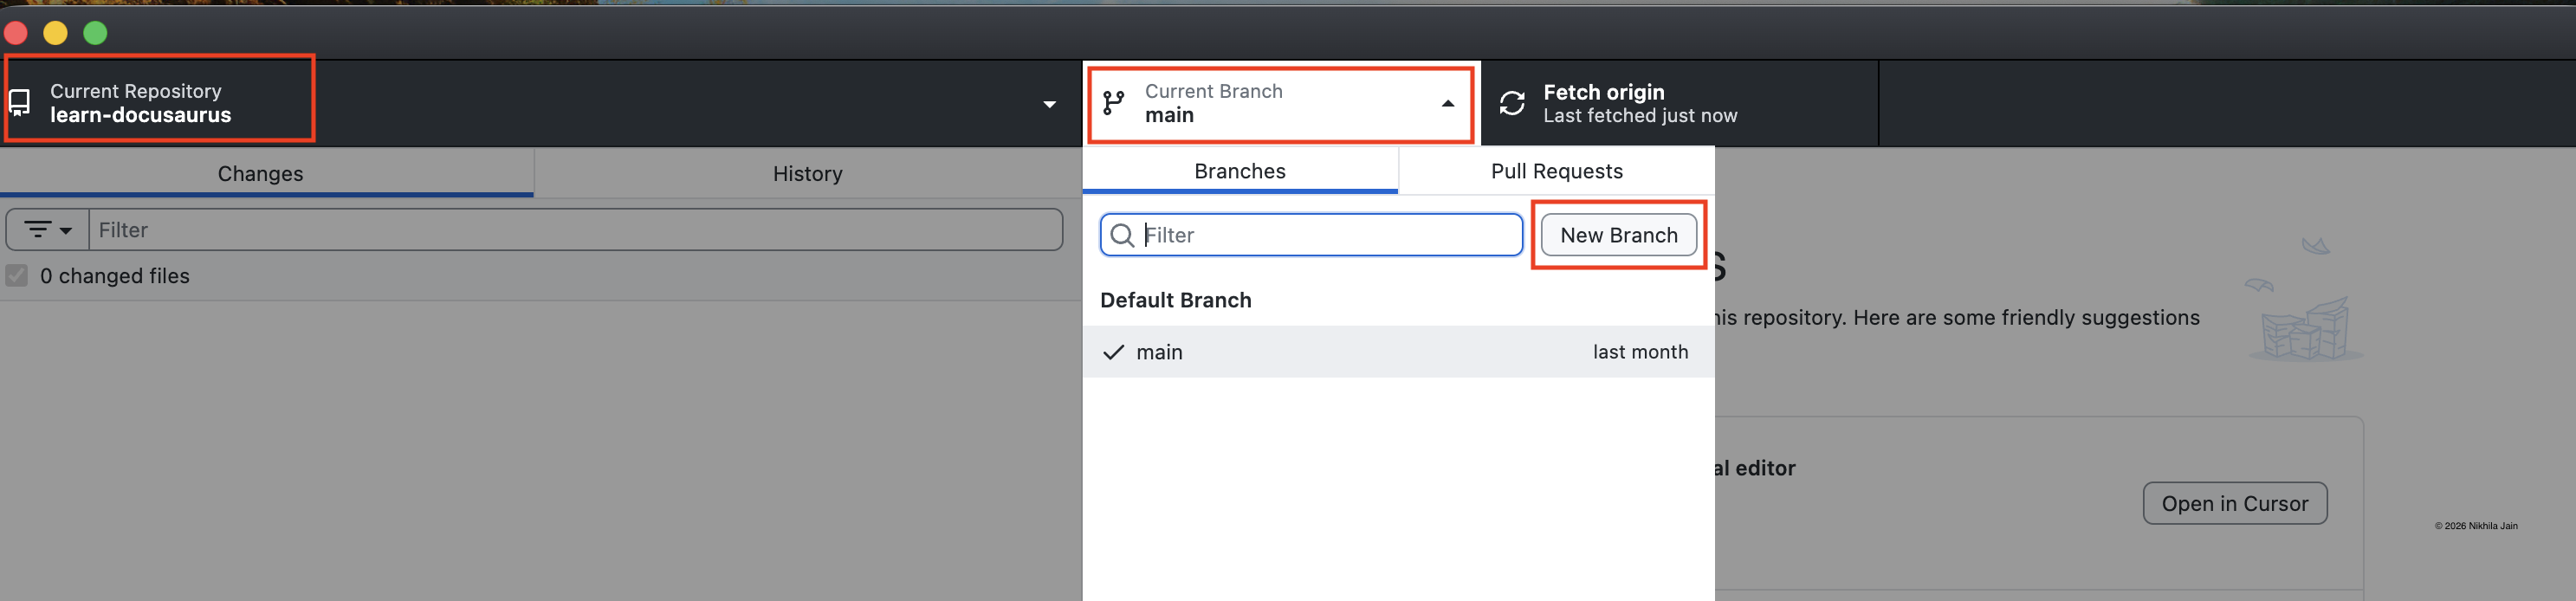
- Open GitHub Desktop and select your documentation repository
- Look at the top bar where it shows Current Branch: main
- Click that button and select New Branch
- Name your branch descriptively: A good branch name tells your team what you're working on at a glance. I recommend using prefixes:
draft/api-authentication-guide— New contentupdate/installation-instructions— Revising existing contentfix/broken-links-homepage— Bug fixes
tip: Use lowercase with dashes (kebab-case). Be specific enough that someone else can understand your work without asking.
- Click Create Branch. GitHub Desktop creates the branch and switches your local view to this new branch. Right now, it looks identical to
mainbecause you haven't changed anything yet. But from this point forward, every edit you make lives only on this branch.
The main branch and your published documentation remain completely untouched.
Edit and commit your work #
Now you work exactly as you did in the previous tutorial.
- Open your documentation files in your preferred text editor
- Write, revise, add images, restructure—whatever your task requires
- Save your files
When you return to GitHub Desktop, you'll see your changes listed in the "Changes" tab.
warning: Critical check: Before committing, look at the top bar. Confirm it shows your branch name (for example,
draft/api-authentication-guide), NOTmain.
This simple check prevents the most common mistake: accidentally committing to the wrong branch.
Now commit your changes:
- Write a clear summary in the commit message field (for example, "Add authentication flow diagram")
- Click Commit to [your-branch-name]
You've just saved a snapshot of your work to your branch. The main branch remains exactly as it was.
This is one of the most liberating aspects of branching: you can commit as often as you want without any risk. Commit frequently—after completing each section, after adding images, whenever you reach a natural stopping point.
Each commit is a checkpoint you can return to if needed.
Save your branch to the cloud #
Your branch currently lives only on your computer. Back it up to GitHub:
- Click Publish branch in the top bar (or Push origin if you've published before)
- Your branch is now safely stored on GitHub.com
- Share the link with colleagues for early feedback
- Your readers still can't see it—only your team can
This is the magic of branches: share drafts safely without exposing incomplete work to the world.
Share your work: Create pull request #
You've created a branch, made your changes, committed them, and published to GitHub, but it's still just an isolated draft. To get your team to review it and bring it into the official documentation, you need to formally propose your changes.
This is where pull requests come in. A pull request (PR) is your way of saying: "I have changes on my branch. I'd like to propose bringing them into main." It's the standard for collaborative writing in GitHub.
Think of it as submitting your work for inclusion in the official documentation.
note: Even if you're working solo, creating a PR is valuable—it gives you a clear record of what changed and why.
How to create a pull request #
Once your branch is published to GitHub:
- In GitHub Desktop, click the Create Pull Request button (it appears after you publish your branch)
- Your browser opens to GitHub.com with a pull request form
- Fill in the details:
- Title: Clear summary of what you changed (for example, "Add API authentication guide")
- Description: Provide context. What did you change? Why? What should reviewers know?
note: Use the description to explain what you changed and why. This gives reviewers the context they need to approve your work faster.
- On the right sidebar, you can assign Reviewers (another writer, a subject matter expert, or a developer)
- Click Create pull request
info: What just happened? Your PR is now live on GitHub. If you assigned reviewers, they'll receive a notification. The PR creates a dedicated space where people can see your changes, discuss them, and eventually approve them for merging into
main.
Your branch remains separate from main until the PR is approved and merged. You can continue making commits to your branch, and they'll automatically appear in the PR.
Remember that Friday afternoon nightmare? It’s gone. You can now ship that urgent pricing fix immediately on its own branch, while your messy API rewrite stays safely tucked away on another branch. You fix the problem without losing your progress. That is the power of branching.
Ready to master GitHub workflows? #
You've just unlocked a powerful way to work on documentation without fear of breaking things. Branches and pull requests are the foundation of modern documentation workflows, and you're now equipped to use them effectively.
Your next steps: #
- Try it yourself: The next time you need to update documentation, create a new branch in GitHub Desktop
- Share your work: Create a pull request, even for small changes
- Practice makes perfect: The more you use branches, the more natural it will feel
💡 Pro Tip: Bookmark this page as a reference. The branching workflow will become second nature with practice.
In the next post, we'll dive into the PR review process—where your work gets polished through collaboration. Until then, happy branching! 🚀